In the realm of technology, where products often clash like ice and fire, there emerges an unlikely alliance that defies conventional wisdom. Snowflake and Helios, two titans in their own right, have forged a symbiotic relationship that epitomizes collaboration and synergy. While George R.R. Martin’s “A Song of Ice and Fire” paints a picture of conflict and discord, in the world of data and development, Snowflake and Helios stand as pillars of cooperation.

Snowflake, renowned for its prowess as a big data store, offers unparalleled capabilities in managing and analyzing vast amounts of data. Its architecture, built for the cloud, provides scalability, reliability, and performance that are second to none. Organizations across industries rely on Snowflake to unlock insights, drive innovation, and power their decision-making processes.
On the other side of the spectrum lies Helios, a product crafted by codbex, designed to provide developers with an instantly available web development environment. Helios streamlines the development process, offering a seamless interface and powerful tools that empower developers to build, test, and deploy applications with ease. Its integration with Snowflake opens up new possibilities, allowing developers to leverage the rich data capabilities of Snowflake within their development workflow.
What makes the union of Snowflake and Helios truly remarkable is the synergy they create. While Snowflake lays the foundation with its robust data infrastructure, Helios adds a layer of agility and efficiency to the development cycle. Together, they form a cohesive ecosystem where data and development converge seamlessly.
End-to-End JavaScript Development Made Easy
Helios provides developers with everything they need for end-to-end JavaScript development. Whether you’re crafting server-side RESTful services, building intricate user interfaces, or implementing complex business logic, Helios equips you with the tools to tackle any challenge. With its support for JavaScript and TypeScript, Helios offers unparalleled flexibility and scalability, allowing you to develop enterprise-grade applications with confidence.
For more key features you can visit the Helios Edition page.
Deploying Helios on Snowpark and utilizing Snowflake
In Helios we have added the ability to connect to Snowflake database using the Database perspective, with that in mind will also use the Git perspective to clone an already build application, create stored procudere and utilize both Helios’ and Snowflake’s strengths.
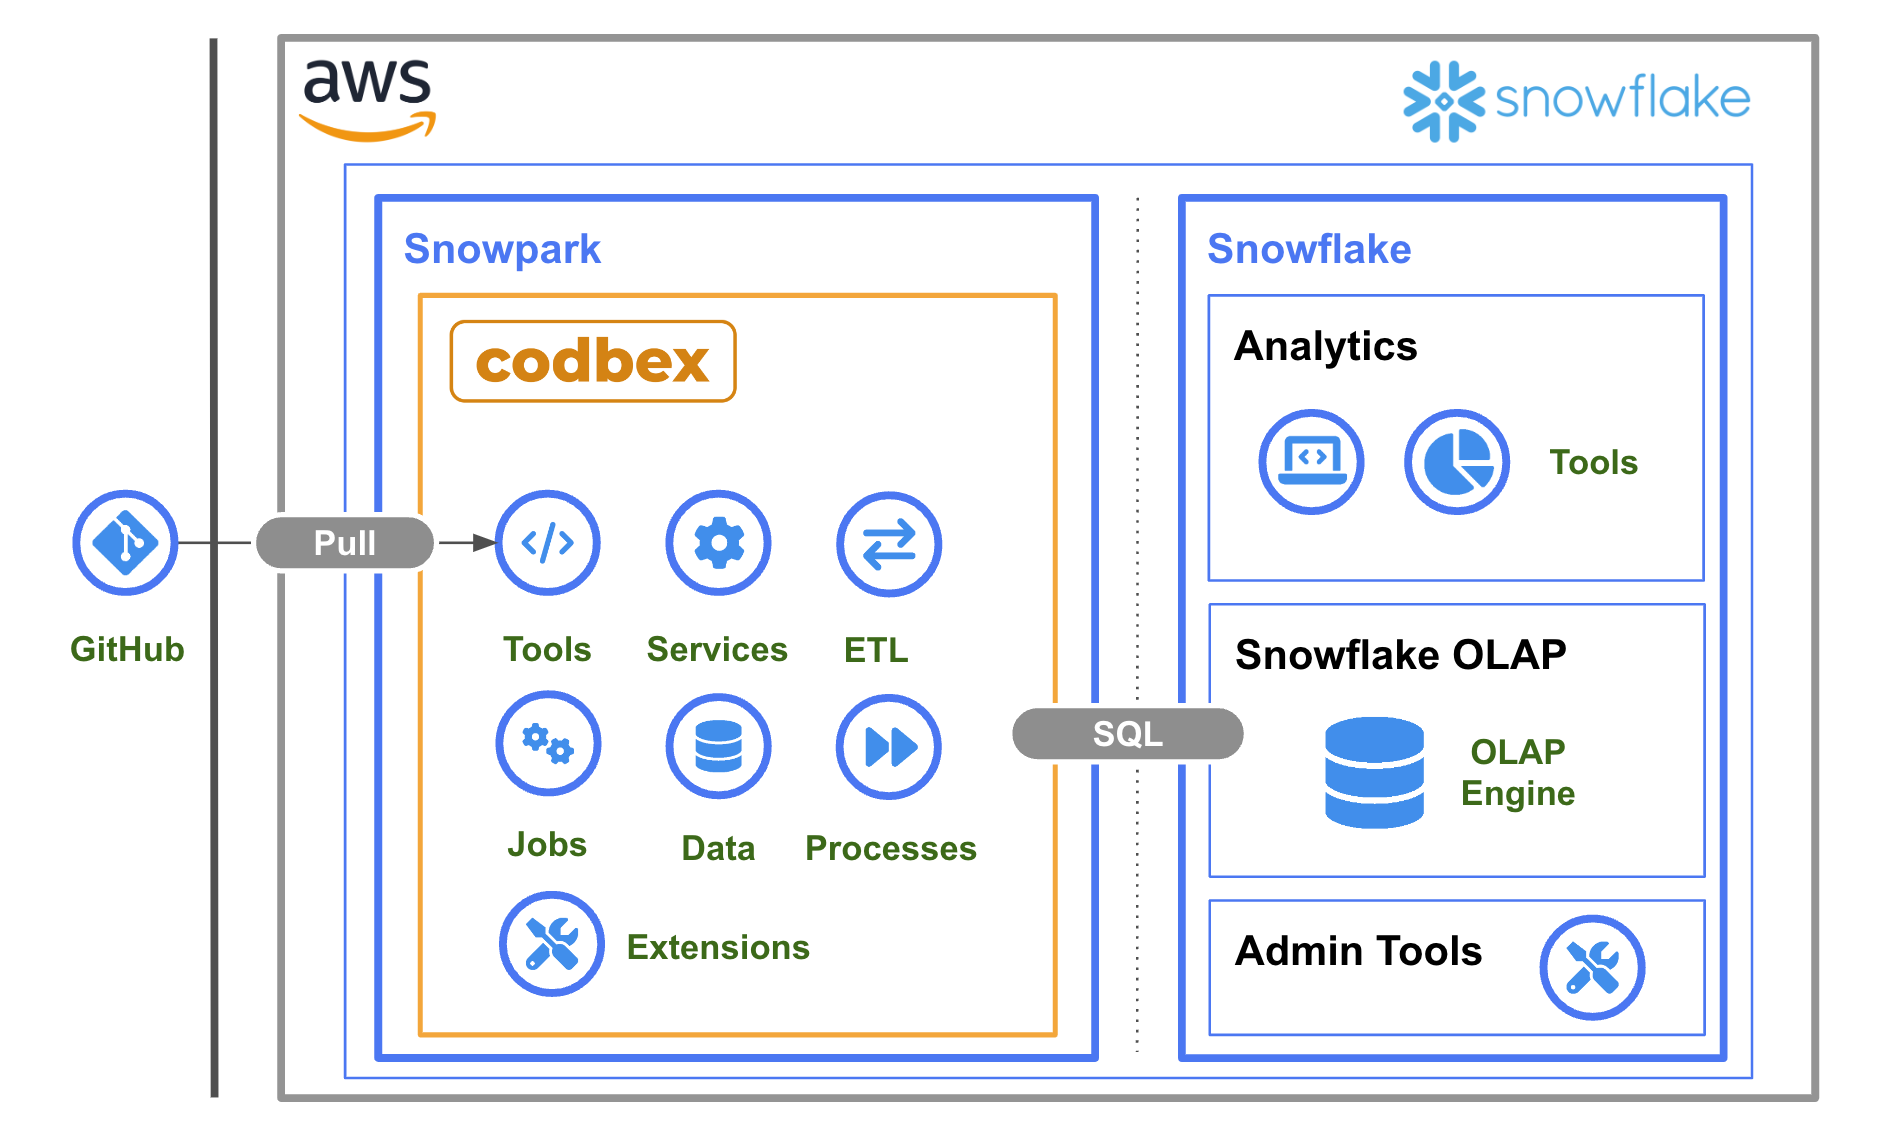
In this section we will dive into how to deploy Helios on Snowpark and connect to Snowflake automatically.
Snowflake setup
-
Create a non-trial Snowflake account
-
In a worksheet execute the following commands:
2.1. New role, privileges, warehouse and DB:
 // Create an CONTAINER_USER_ROLE with required privileges
 USE ROLE ACCOUNTADMIN;
 CREATE ROLE CONTAINER_USER_ROLE;
 GRANT CREATE DATABASE ON ACCOUNT TO ROLE CONTAINER_USER_ROLE;
 GRANT CREATE WAREHOUSE ON ACCOUNT TO ROLE CONTAINER_USER_ROLE;
 GRANT CREATE COMPUTE POOL ON ACCOUNT TO ROLE CONTAINER_USER_ROLE;
 GRANT CREATE INTEGRATION ON ACCOUNT TO ROLE CONTAINER_USER_ROLE;
 GRANT MONITOR USAGE ON ACCOUNT TO  ROLE  CONTAINER_USER_ROLE;
 GRANT BIND SERVICE ENDPOINT ON ACCOUNT TO ROLE CONTAINER_USER_ROLE;
 GRANT IMPORTED PRIVILEGES ON DATABASE snowflake TO ROLE CONTAINER_USER_ROLE;

 // Grant CONTAINER_USER_ROLE to ACCOUNTADMIN
 grant role CONTAINER_USER_ROLE to role ACCOUNTADMIN;

 // Create Database, Warehouse, and Image spec stage
 USE ROLE CONTAINER_USER_ROLE;
 CREATE OR REPLACE DATABASE CONTAINER_HOL_DB;

 CREATE OR REPLACE WAREHOUSE CONTAINER_HOL_WH
 WAREHOUSE_SIZE = XSMALL
 AUTO_SUSPEND = 120
 AUTO_RESUME = TRUE;

 CREATE STAGE IF NOT EXISTS specs
 ENCRYPTION = (TYPE='SNOWFLAKE_SSE');

 CREATE STAGE IF NOT EXISTS volumes
 ENCRYPTION = (TYPE='SNOWFLAKE_SSE')
 DIRECTORY = (ENABLE = TRUE);
2.2. Compute pool and image repository:
 USE ROLE ACCOUNTADMIN;
 CREATE SECURITY INTEGRATION IF NOT EXISTS snowservices_ingress_oauth
 TYPE=oauth
 OAUTH_CLIENT=snowservices_ingress
 ENABLED=true;

 USE ROLE CONTAINER_USER_ROLE;
 CREATE COMPUTE POOL IF NOT EXISTS CONTAINER_HOL_POOL
 MIN_NODES = 1
 MAX_NODES = 1
 INSTANCE_FAMILY = CPU_X64_XS;

 CREATE IMAGE REPOSITORY CONTAINER_HOL_DB.PUBLIC.IMAGE_REPO;

 SHOW IMAGE REPOSITORIES IN SCHEMA CONTAINER_HOL_DB.PUBLIC;
Setup local environment
- Download and install the miniconda installer from https://conda.io/miniconda.html.
- Create a file
conda_env.yamlname: snowpark-container-services-hol channels: - https://repo.anaconda.com/pkgs/snowflake dependencies: - python=3.10 - snowflake-snowpark-python[pandas] - ipykernel - Create the conda environment.
conda env create -f conda_env.yml - Activate the conda environment.
conda activate snowpark-container-services-hol - Install hatch so we can build the SnowCLI:
pip install hatch - Install SnowCLI:
# naviage to where you want to download the snowcli GitHub repo, e.g. ~/Downloads cd /your/preferred/path # clone the git repo git clone https://github.com/Snowflake-Labs/snowcli # cd into the snowcli repo cd snowcli # install hatch build && pip install . # during install you may observe some dependency errors, # which should be okay for the time being - Configure your Snowflake CLI connection by following the steps
snow connection addtest the connection
 # test the connection:
 snow connection test --connection "CONTAINER_hol"
Docker image preperation
- Pull latest codbex-helios image
docker pull ghcr.io/codbex/codbex-helios:latest!!! If you are on ARM architecture:
export DOCKER_DEFAULT_PLATFORM=linux/amd64 - Login in your Snowflake image repository
# snowflake_registry_hostname = org-account.registry.snowflakecomputing.com docker login <snowflake_registry_hostname> -u <user_name> - Tag and push
```bash
# repository_url = org-account.registry.snowflakecomputing.com/CONTAINER_hol_db/public/image_repo
docker tag codbex-helios:latest
/codbex-helios:dev docker push /codbex-helios:dev
Creating the Helios service
-
Create spec file for service deployment
codbex-helios-snowpark.yaml
spec: containers: - name: codbex-helios-snowpark image: <repository_hostname>/container_hol_db/public/image_repo/codbex-helios:dev volumeMounts: - name: codbex-helios-home mountPath: /home/codbex-helios env: DIRIGIBLE_DATABASE_CUSTOM_DATASOURCES: SNOWFLAKE DIRIGIBLE_DATABASE_DATASOURCE_NAME_DEFAULT: SNOWFLAKE DIRIGIBLE_SINGLE_TENANT_MODE_ENABLED: true SNOWFLAKE_DRIVER: net.snowflake.client.jdbc.SnowflakeDriver SNOWFLAKE_URL: jdbc:snowflake://your-snowlfake-account.snowflakecomputing.com/ \ ?db=CONTAINER_HOL_DB&schema=PUBLIC&warehouse=CONTAINER_HOL_WH SNOWFLAKE_USERNAME: your-snowflake-username SNOWFLAKE_PASSWORD: your-snowflake-password SNOWFLAKE_WAREHOUSE: CONTAINER_HOL_WH SNOWFLAKE_DATABASE: CONTAINER_HOL_DB SNOWFLAKE_SCHEMA: PUBLIC CLIENT_SESSION_KEEP_ALIVE: true endpoints: - name: codbex-helios-snowpark port: 80 public: true volumes: - name: codbex-helios-home source: "CONTAINER_HOL_DB.PUBLIC.VOLUMES" uid: 1000 gid: 1000 networkPolicyConfig: allowInternetEgress: true - Deploy the spec file:
snow object stage copy ./src/codbex-helios-snowpark/codbex-helios.yaml \ @specs --overwrite --connection CONTAINER_hol - In the Snowflake worksheet execute the following command:
CREATE SERVICE codbex_helios in compute pool CONTAINER_HOL_POOL from @specs spec = 'codbex-helios-snowpark.yaml'; - Check your service:
CALL SYSTEM$GET_SERVICE_STATUS('CONTAINER_HOL_DB.PUBLIC.CODBEX_HELIOS'); CALL SYSTEM$GET_SERVICE_LOGS('CONTAINER_HOL_DB.PUBLIC.CODBEX_HELIOS', '0', 'codbex-helios', 10); CALL SYSTEM$REGISTRY_LIST_IMAGES('/CONTAINER_HOL_DB/PUBLIC/IMAGE_REPO'); SHOW SERVICES like 'codbex_helios'; - Get service endpoint
SHOW ENDPOINTS IN SERVICE codbex_helios;
Using your newly deployed Helios
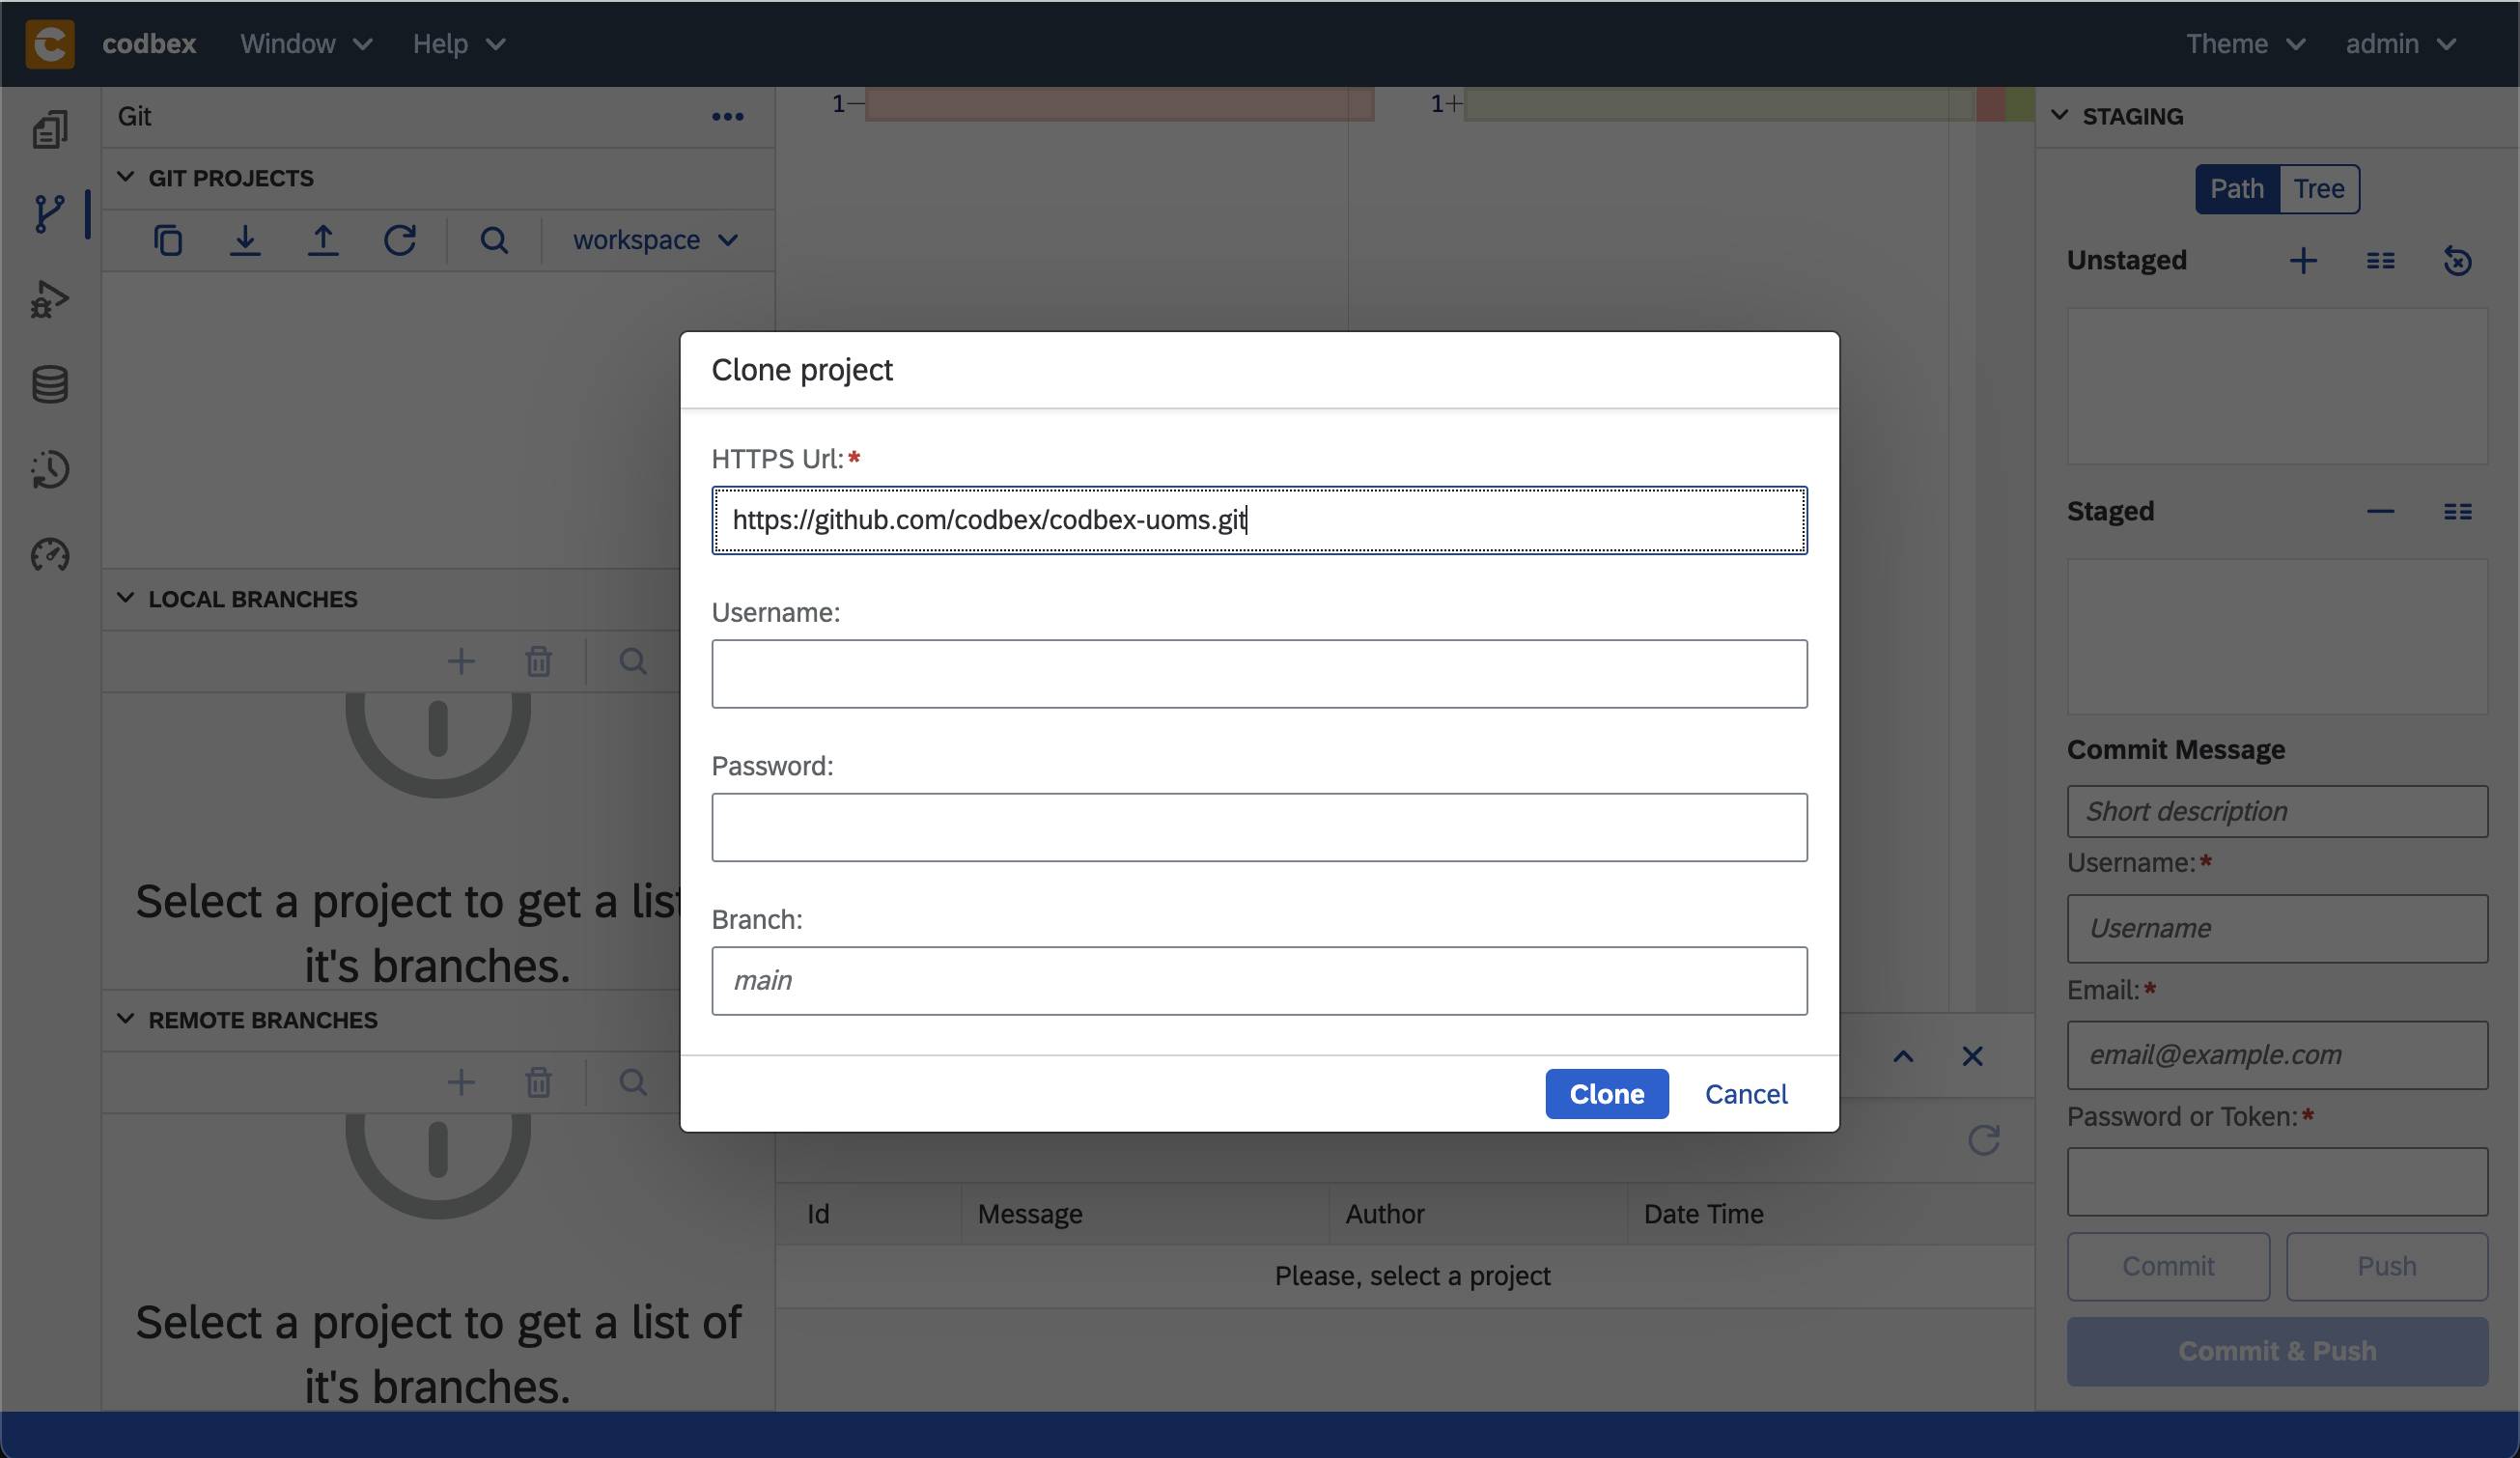
Now lets use Helios’ Git perspective and clone some already existing repositories to continue the tutorial:
https://github.com/codbex/codbex-uoms - application for managing Units of Measure
https://github.com/codbex/codbex-uoms-data - predefined units that will be automatically imported into the Snowflake database
Go back to the Workspace, here you will find that codbex-uoms is a full-stack application and usable withing Snowpark.
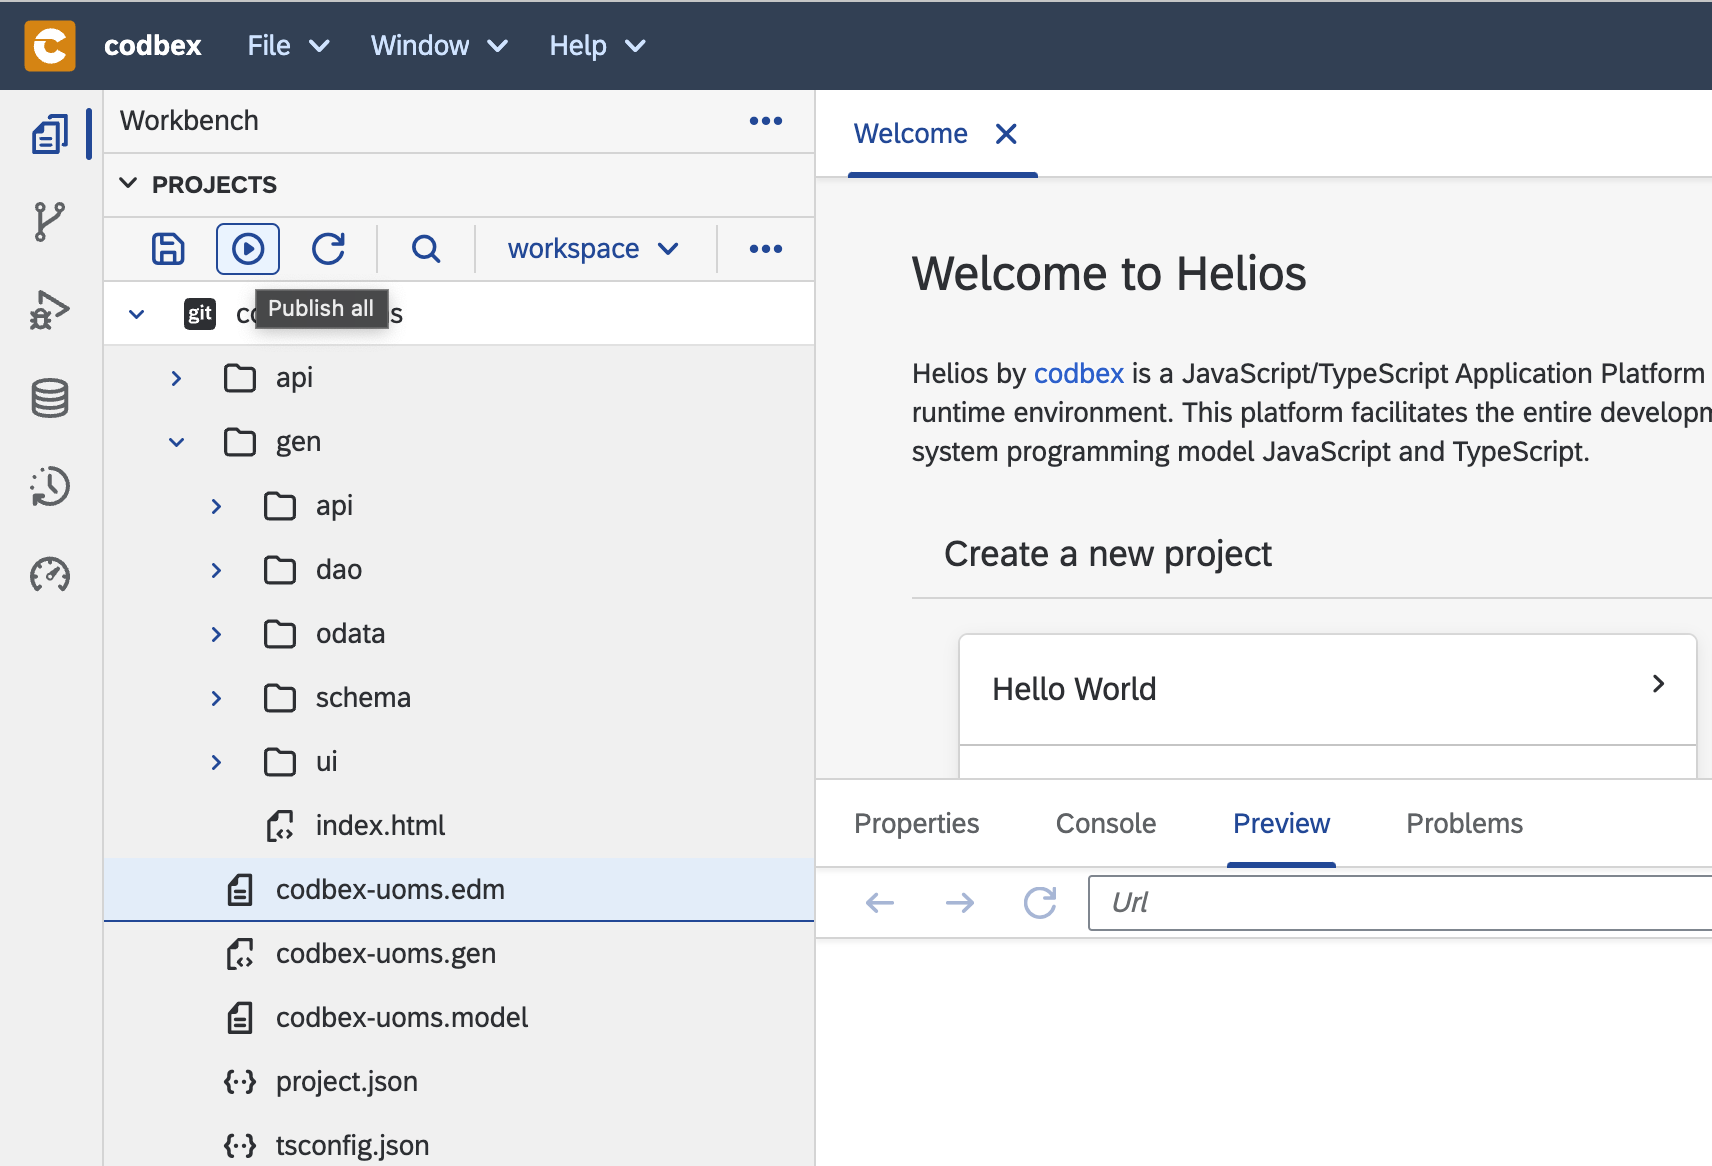
- Publish all projects in the Workspace
- Navigate to codbex-uoms -> gen -> index.html
- Open the link at the bottom and explore the dashboard
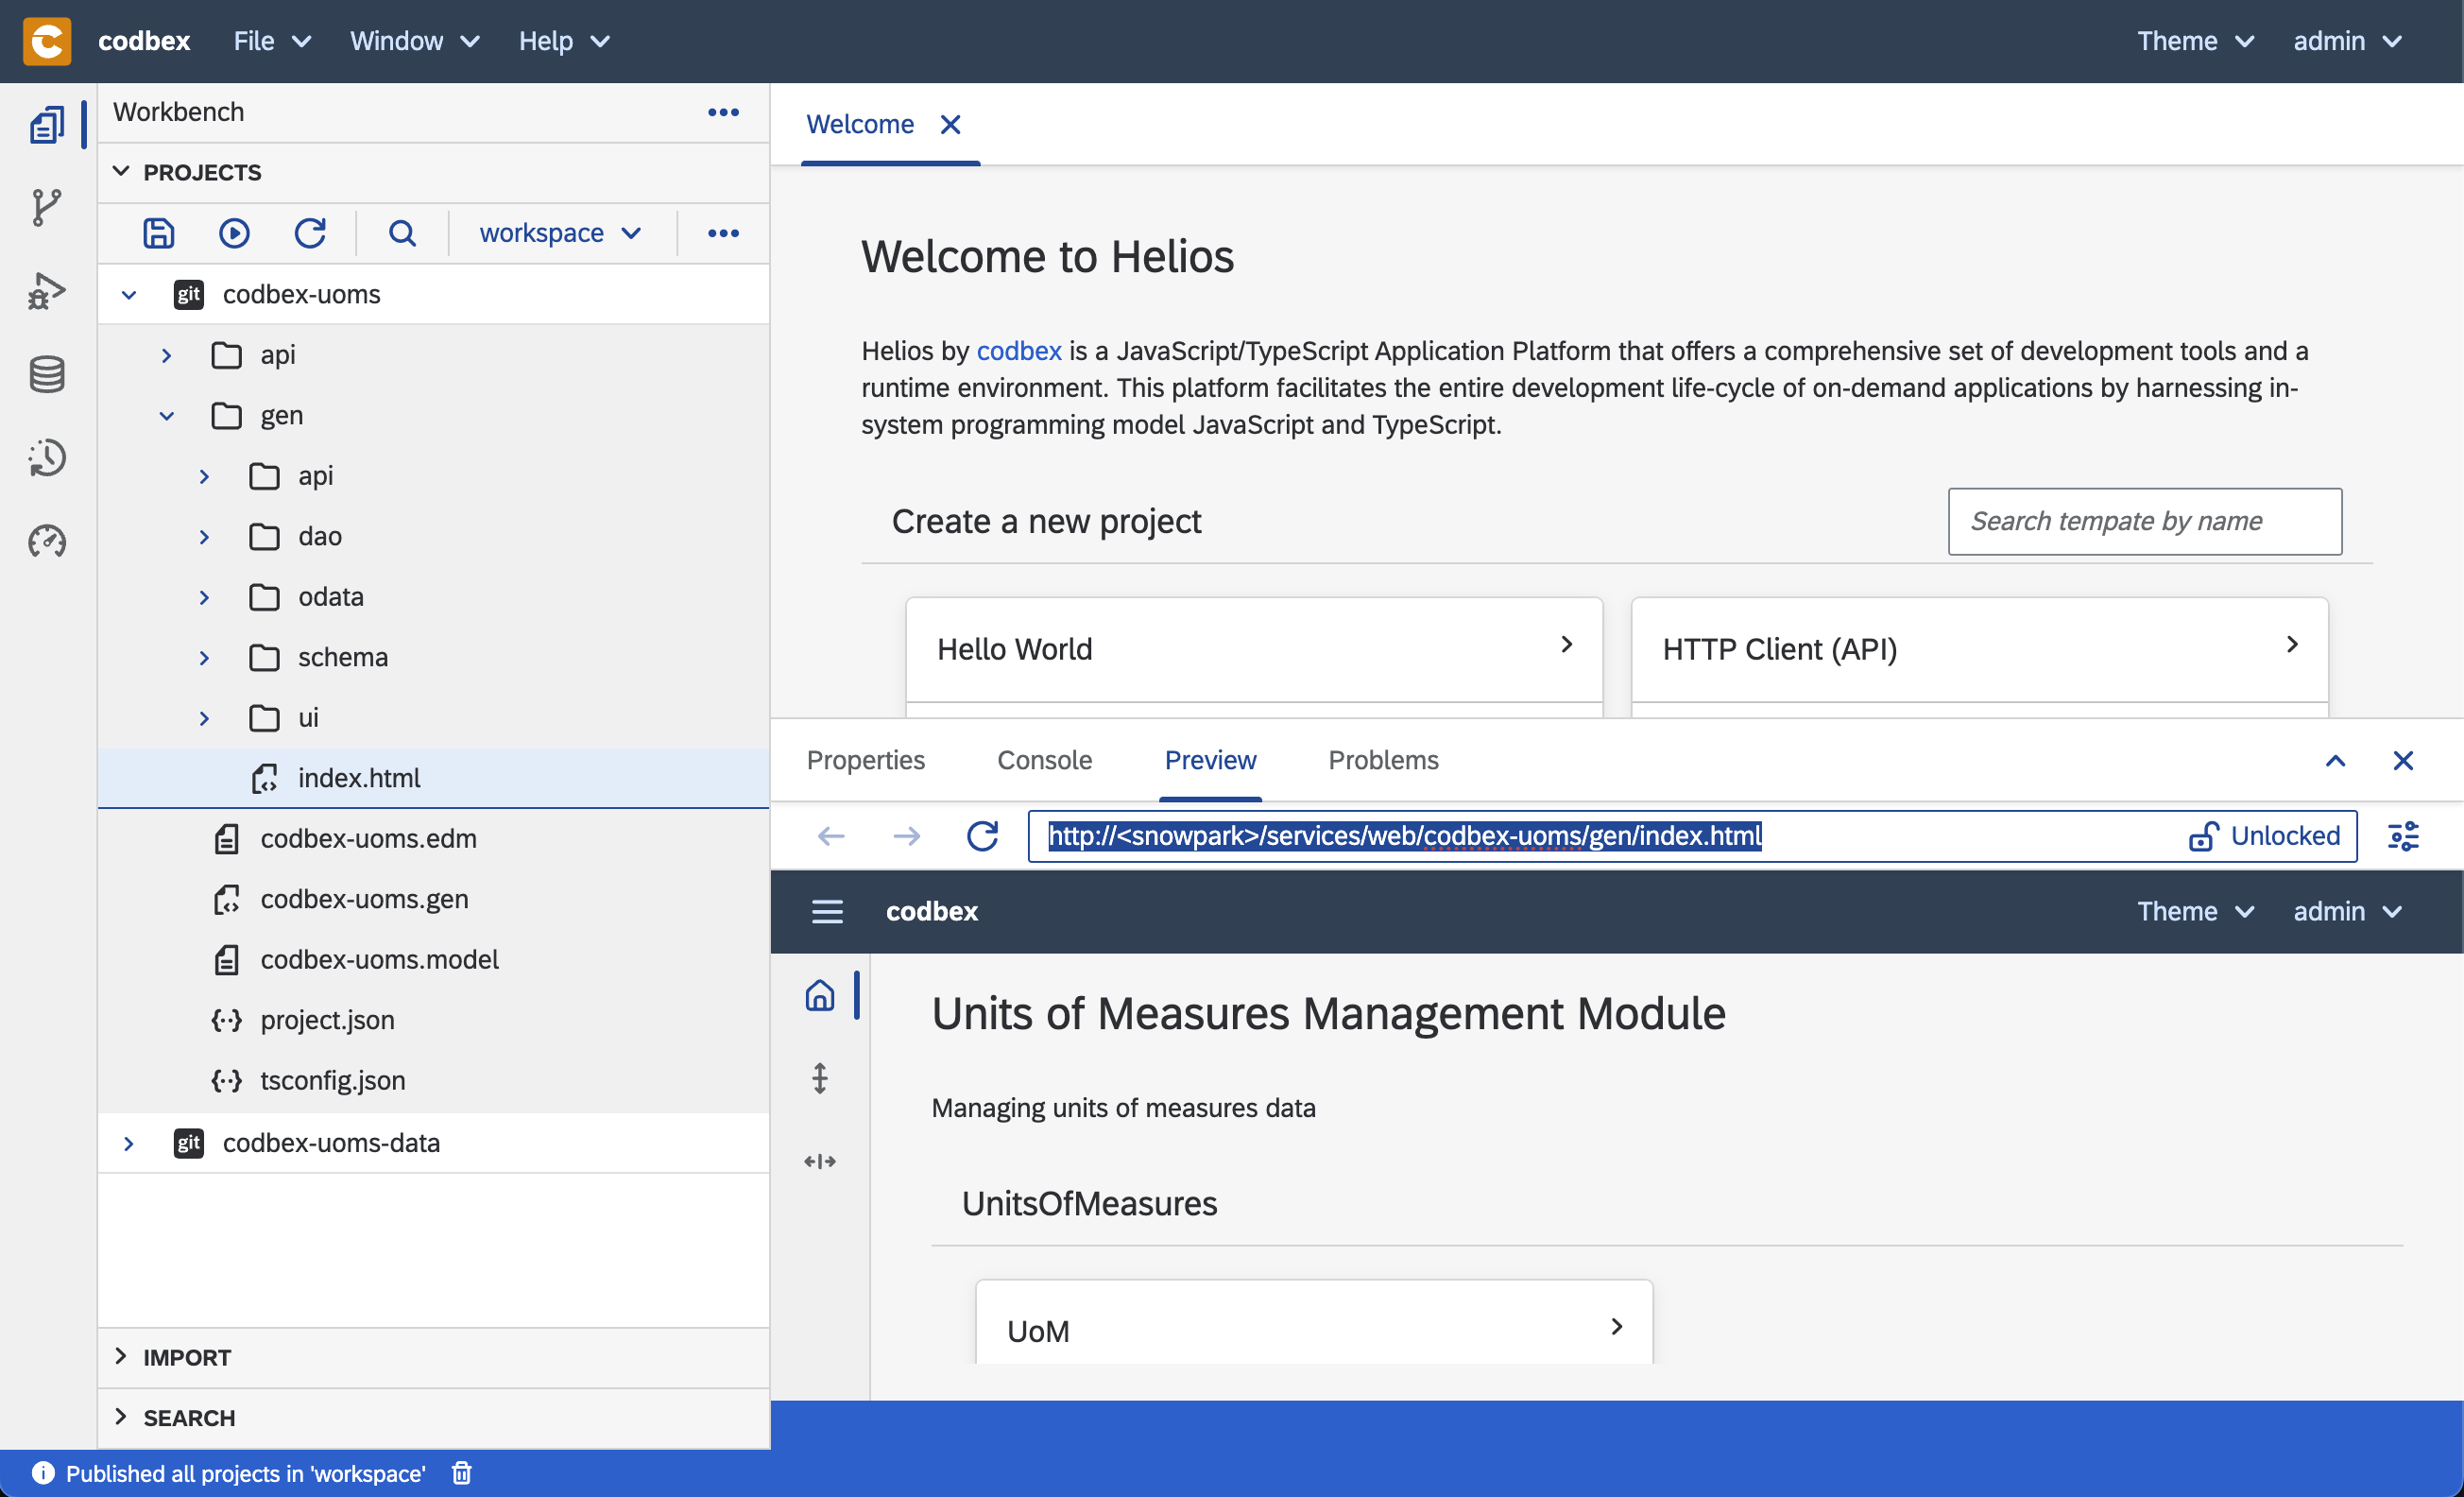
- or copy the URL and open it in a new browser tab:
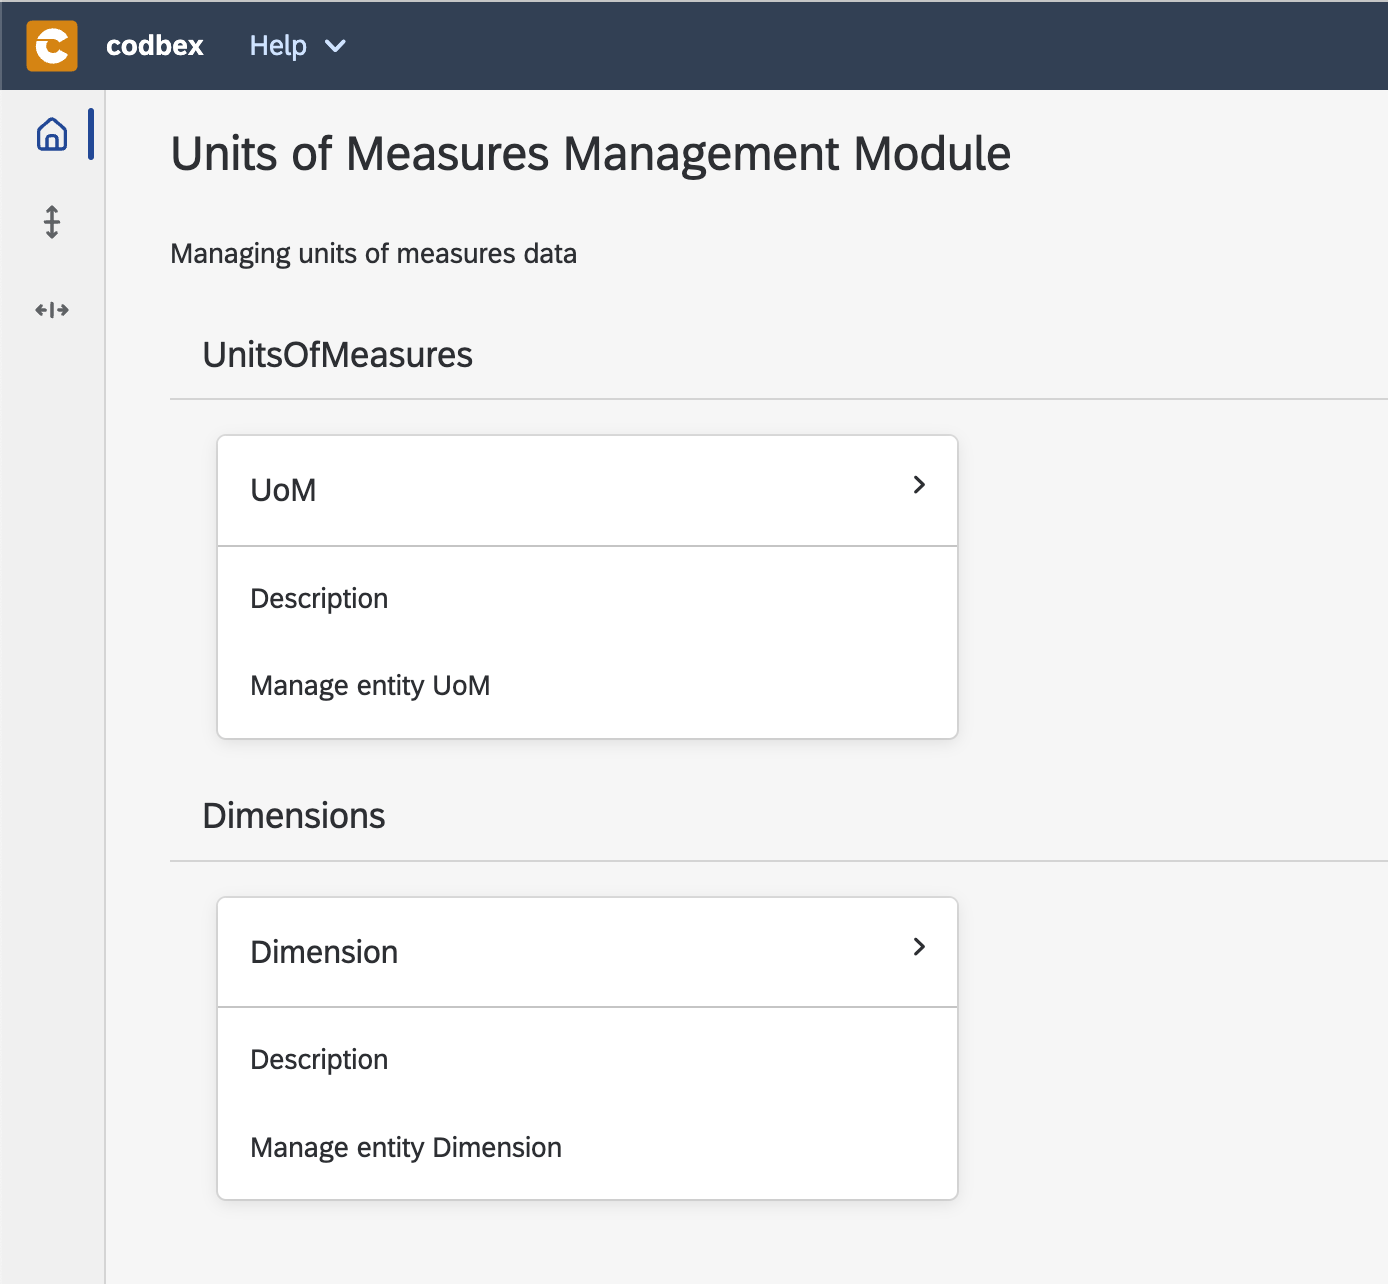
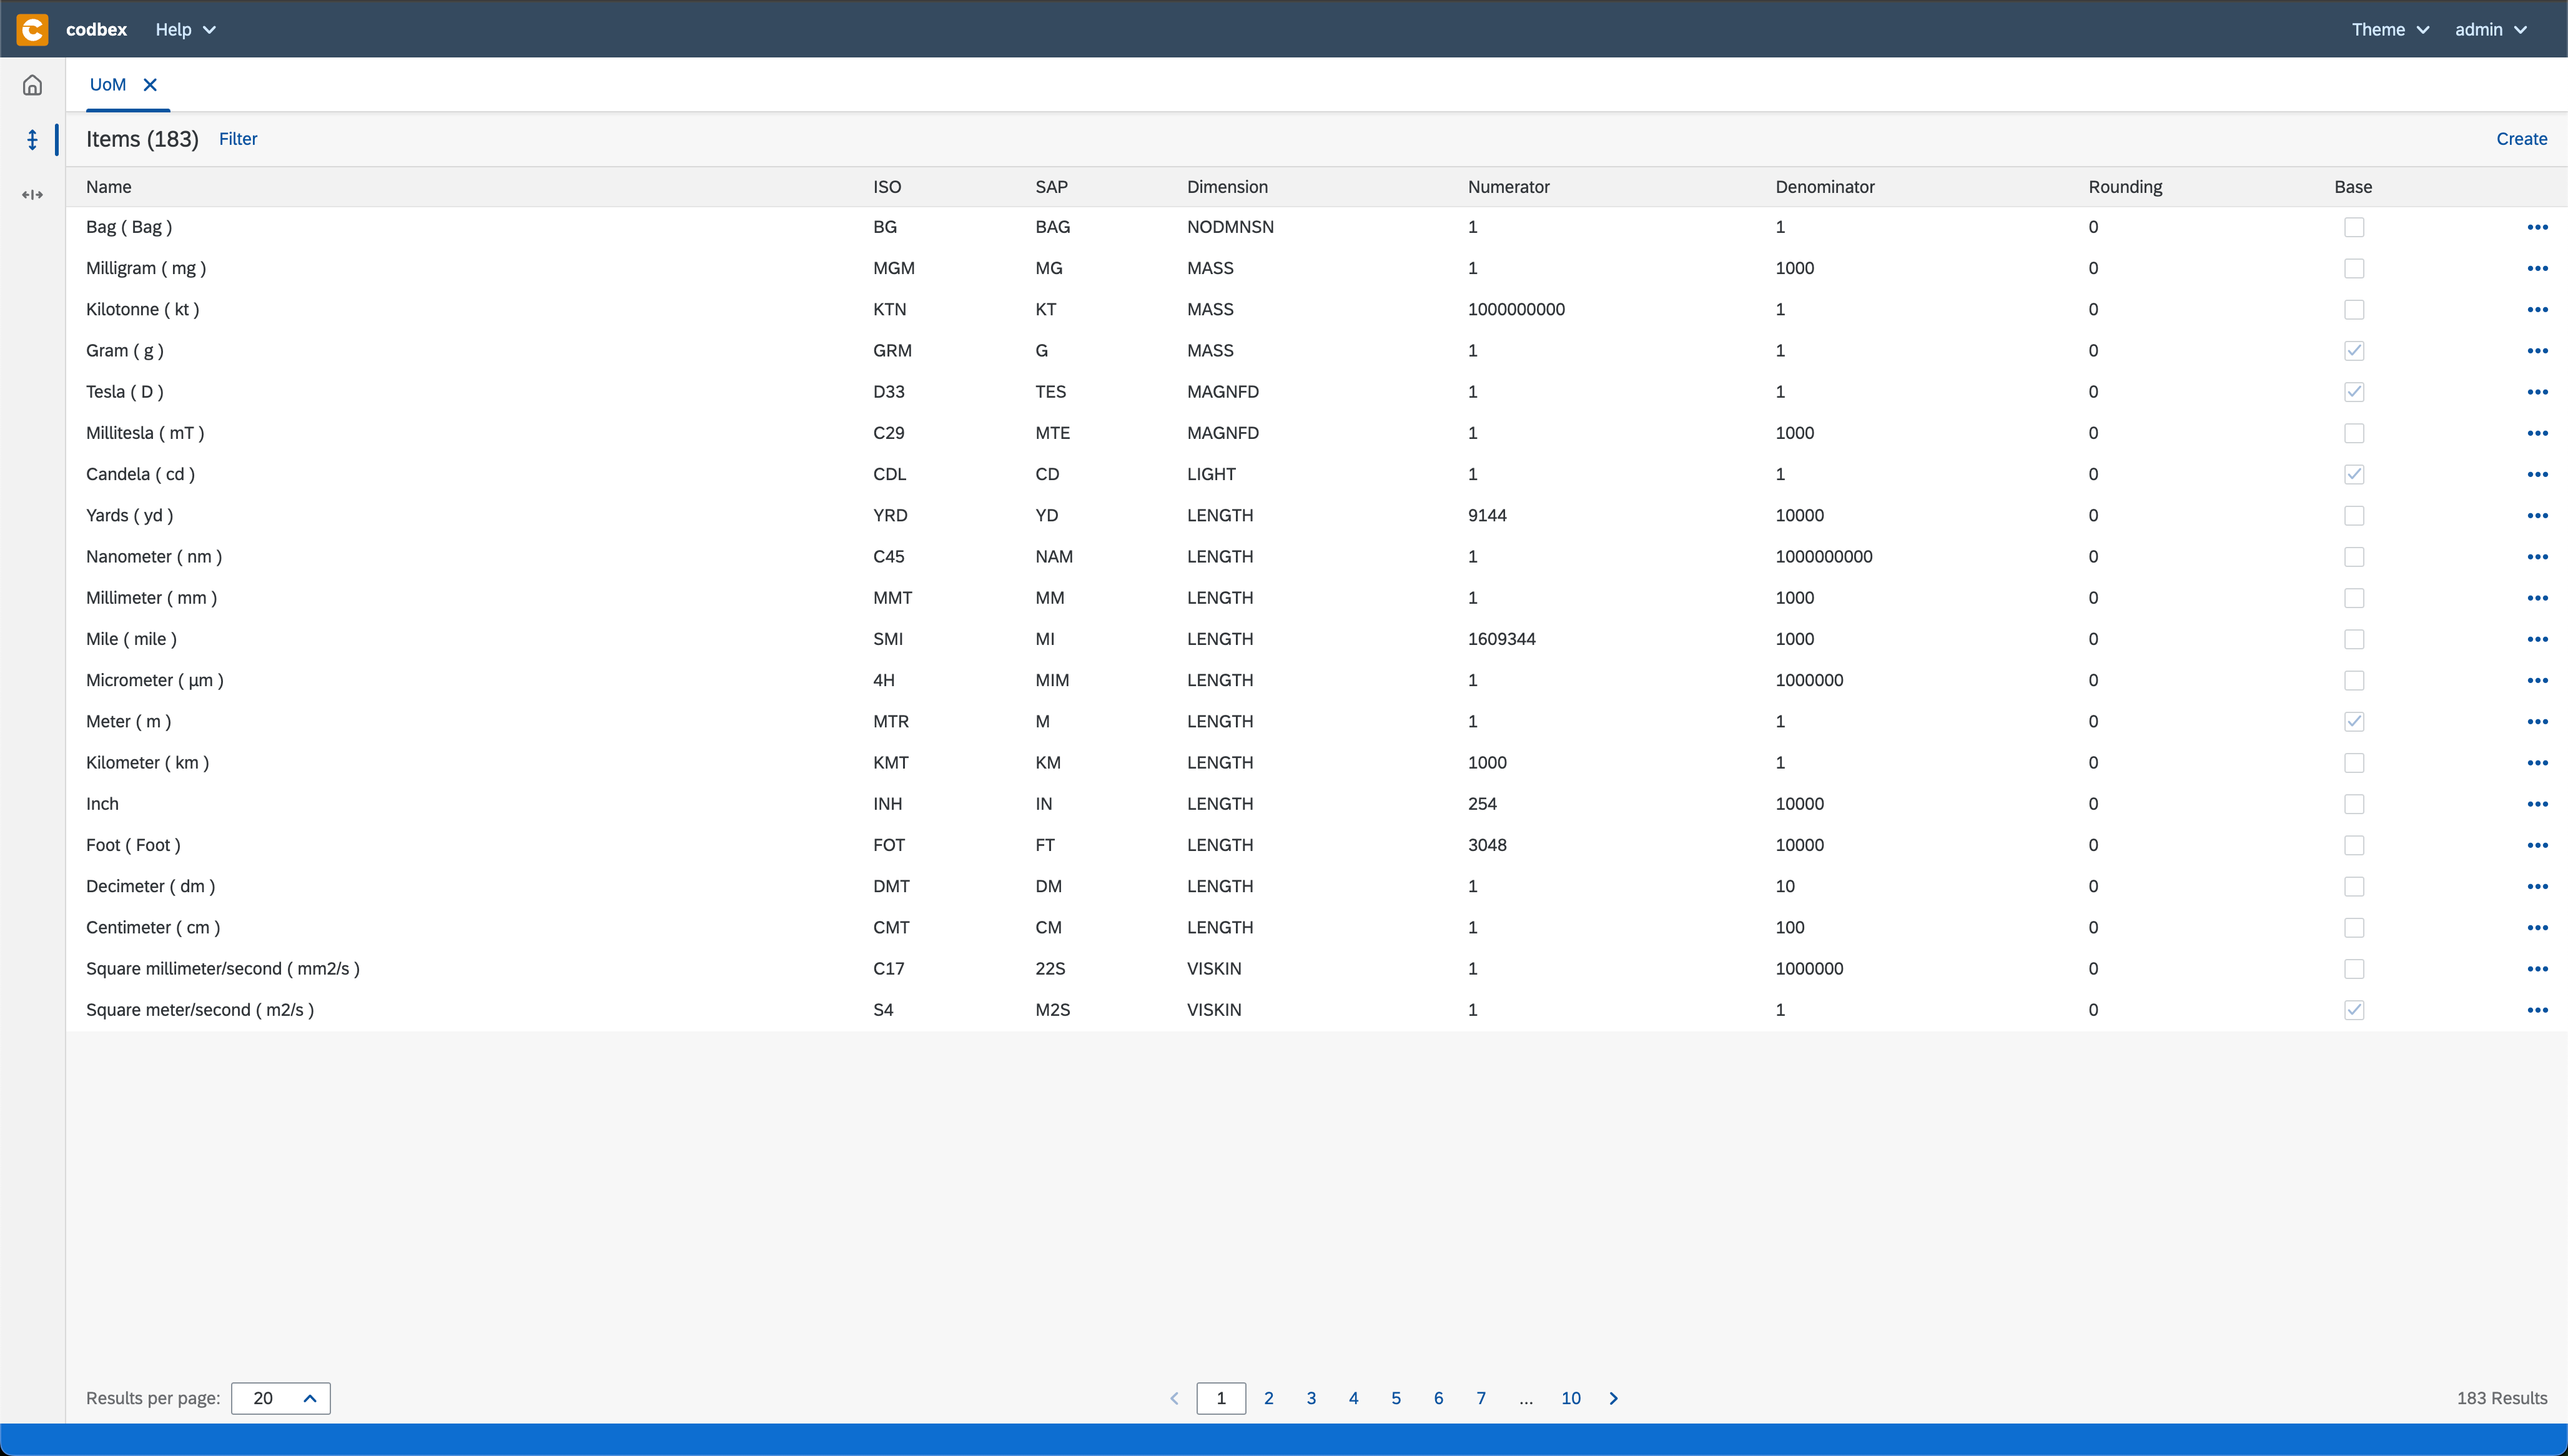
- and select UoM tile:
In the Database perspective select your SNOWFLAKE datasource and in the SQL console execute:
ALTER SESSION SET JDBC_QUERY_RESULT_FORMAT='JSON';
Note: The above statement is just for information only as it is applied by default for Snowflake database connections.
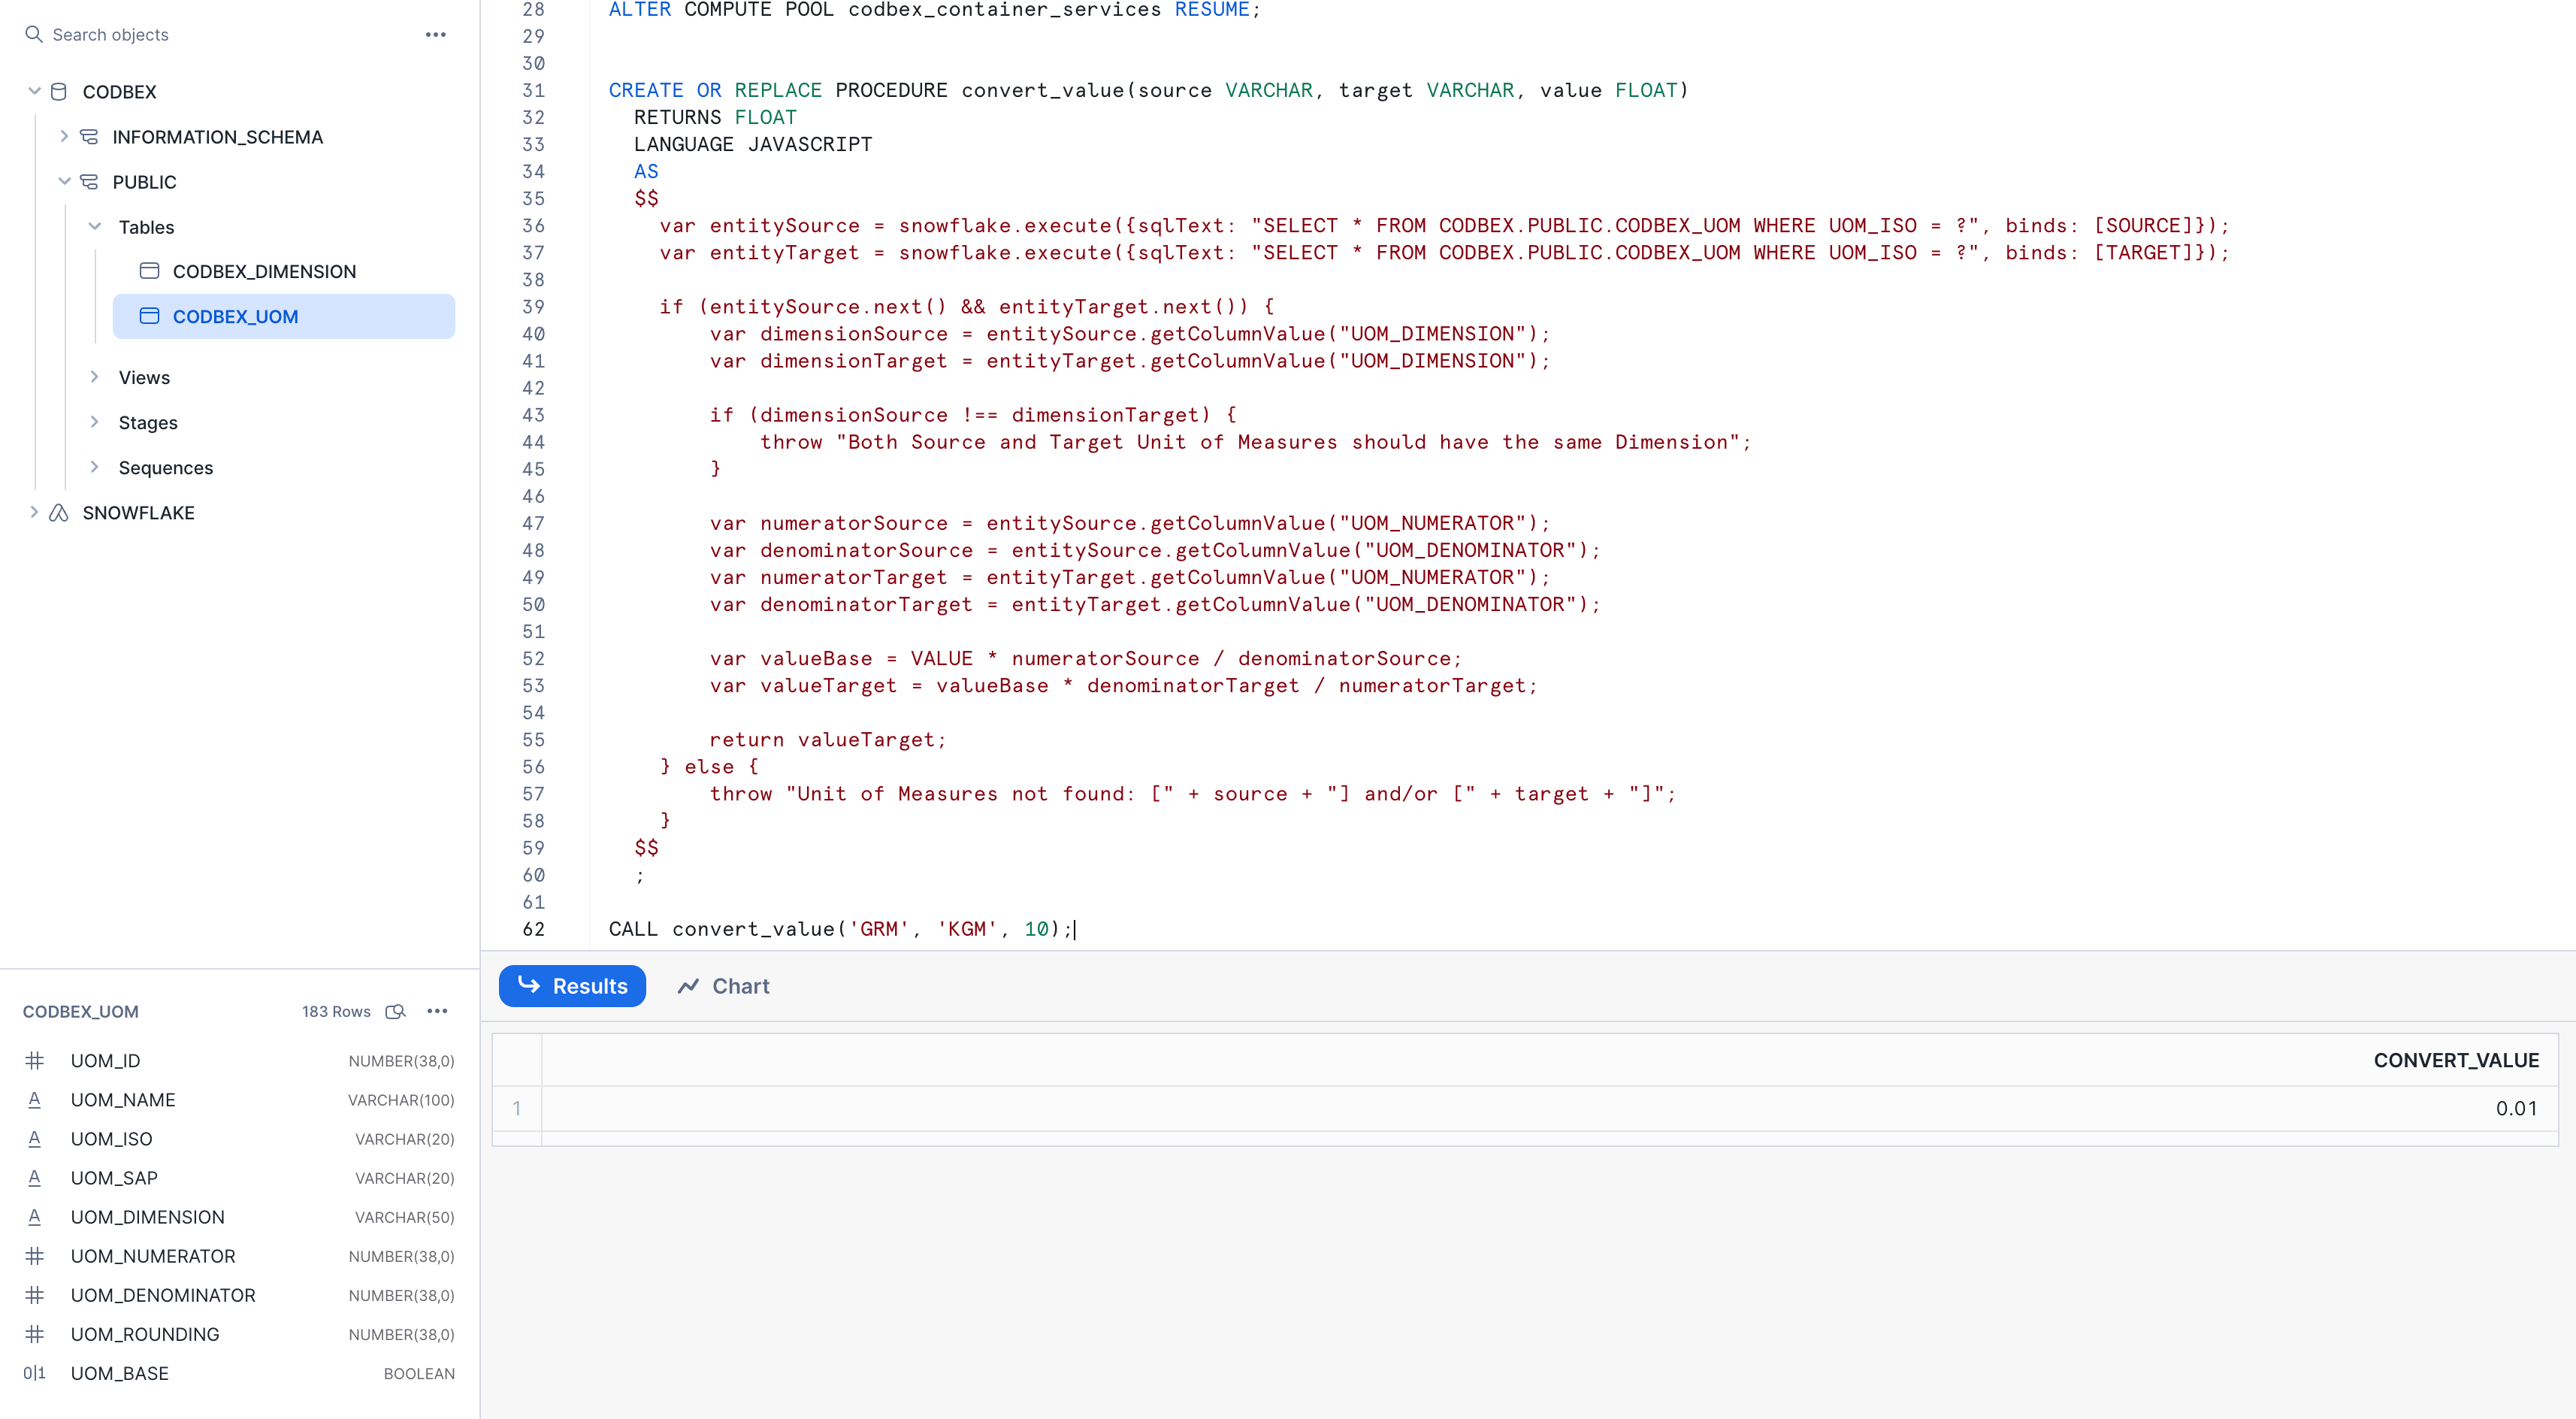
Its time to write a stored procedure that will use the Units of Measure and do a simple conversion
-
Go to your
Snowflakeworksheet and paste the following:CREATE OR REPLACE PROCEDURE convert_value(source VARCHAR, target VARCHAR, value FLOAT) RETURNS FLOAT LANGUAGE JAVASCRIPT AS $$ var entitySource = snowflake.execute( { sqlText: "SELECT * FROM CODBEX.PUBLIC.CODBEX_UOM WHERE UOM_ISO = ?", binds: [SOURCE] }); var entityTarget = snowflake.execute( { sqlText: "SELECT * FROM CODBEX.PUBLIC.CODBEX_UOM WHERE UOM_ISO = ?", binds: [TARGET] }); if (entitySource.next() && entityTarget.next()) { var dimensionSource = entitySource.getColumnValue("UOM_DIMENSION"); var dimensionTarget = entityTarget.getColumnValue("UOM_DIMENSION"); if (dimensionSource !== dimensionTarget) { throw "Both Source and Target Units of Measures \ must have the same Dimension"; } var numeratorSource = entitySource.getColumnValue("UOM_NUMERATOR"); var denominatorSource = entitySource.getColumnValue("UOM_DENOMINATOR"); var numeratorTarget = entityTarget.getColumnValue("UOM_NUMERATOR"); var denominatorTarget = entityTarget.getColumnValue("UOM_DENOMINATOR"); var valueBase = VALUE * numeratorSource / denominatorSource; var valueTarget = valueBase * denominatorTarget / numeratorTarget; return valueTarget; } else { throw "Unit of Measures not found: [" + source + "] and/or [" + target + "]"; } $$ ; -
Execute the procedure:
CALL convert_value('GRM', 'KGM', 10);
Conclusion
In conclusion, Helios stands as a beacon of innovation and efficiency in the realm of enterprise JavaScript development. With its comprehensive suite of tools and tailored features, it empowers developers to navigate the complexities of modern application development with ease. Helios is more than just a platform – it’s a catalyst for success. By embracing Helios paired with Snowflake, enterprises and development teams can unlock the full potential of JavaScript and propel their projects to new heights of excellence.
For more details about the products and pricing we are available through any of the channels in contacts.

Nedelcho Jr enjoys making cocktails for friends and family.